Today, I'll be talking about art! But first things first. Breakfast.
I make a hot breakfast for the Lewisville kids about 3-4 times a week. Remember, we home school so there's no rush to get out of the house. They love crepes (the french pancakes), baked oatmeal with peaches and cream -minus the peaches, and of course our Sunday morning favorite right after church, french toast, hash browns, and bacon. The other days, the kids have to slave away making their own bowl of cereal. No, I don't feel guilty.
Cereal goes pretty fast in Lewisville. Not only do the kids have it for breakfast a few times a week, but it has happened on a few occasions when the kids and hubby have gone to bed that mom will sneak a bowl for a late night snack. Come on, I know I'm not alone. And, no, I'm not talking about the "healthy" cereal we buy because we're parents who are getting older and needing to eat healthy. We tell ourselves we love granola and tasteless flakes that are hard as rocks. Blah, blah, blah. Though I like granola, during those late night snack sessions, my reach goes beyond the heart healthy brands and moves ever so slightly to pick up what I'm craving- Frosted Flakes and Cocoa Pebbles, or any version of sugar and milk I happen to have in my pantry. So satisfying and now late at night as I'm typing this post, I suddenly have a hankering for a bowl of joy, I mean cereal.
But I will refrain and get to the reason for this post that has a very long introduction. Cereal and Art? How do the two go together? Like this:


These mirrors are pretty and would add delight to any room, but my job as the chief purchasing officer of Lewisville ironically requires me to make as few purchases as possible. Do you see my conundrum here? So when I saw all the starburst people were making with wood dowels and those sticks you use to mix paint, I knew it would only be a matter of time. And it was. I saw this blog post by Stephanie Lynn and realized the decorating fairies were calling me and ordering me to copy it. Ok, maybe that was just in my head, but since I had all the materials (cereal box and glue) I figured it was a sure sign to start creating. Just go with me on this.


 To start, I attached a short diamond then long diamond around the disk. Glue each piece to the back of the disk then to each other.

Make more long diamonds but don't glue the open ends this time. Instead, glue the open ends onto each peak of both short and long diamonds. This is your 2nd layer of diamonds.


I should have added all tear drops at this point, but I had strips of long diamond shaped cereal boxes all over my kitchen that I just wanted to use up with out having to make more. If you are going to make this, use tear drops on your third layer. Finally, glue all the peaks/diamonds together.

 To hang, I made another disk slightly smaller than the one in the center. I cut a big hole in the middle of the disk by folding it in half and cutting a half moon shape. Then, I just glued that to the back. It looked like this.
 Finally, I spray painted it with grey primer first, then used a metallic silver spraypaint. I may change the colors later. I may not.

 I added a 7inch round mirror I picked up at Michael's for a few bucks (50% off). I glued it to the front disk with a product called Liquid Nails. I'm sure you can use hot glue, but since I was placing this above our bed, I didn't want to take a chance of it falling and hitting one of us (me, I'm sure it would have been me) in the head in the middle of the night.
 I love projects you can do over a weekend. Get your glue guns out, eat your cereal, and have fun. By the way, did you notice in the first pictures I don't have a headboard. Oh, you know that will be changing soon too!
I make a hot breakfast for the Lewisville kids about 3-4 times a week. Remember, we home school so there's no rush to get out of the house. They love crepes (the french pancakes), baked oatmeal with peaches and cream -minus the peaches, and of course our Sunday morning favorite right after church, french toast, hash browns, and bacon. The other days, the kids have to slave away making their own bowl of cereal. No, I don't feel guilty.
Cereal goes pretty fast in Lewisville. Not only do the kids have it for breakfast a few times a week, but it has happened on a few occasions when the kids and hubby have gone to bed that mom will sneak a bowl for a late night snack. Come on, I know I'm not alone. And, no, I'm not talking about the "healthy" cereal we buy because we're parents who are getting older and needing to eat healthy. We tell ourselves we love granola and tasteless flakes that are hard as rocks. Blah, blah, blah. Though I like granola, during those late night snack sessions, my reach goes beyond the heart healthy brands and moves ever so slightly to pick up what I'm craving- Frosted Flakes and Cocoa Pebbles, or any version of sugar and milk I happen to have in my pantry. So satisfying and now late at night as I'm typing this post, I suddenly have a hankering for a bowl of joy, I mean cereal.
But I will refrain and get to the reason for this post that has a very long introduction. Cereal and Art? How do the two go together? Like this:


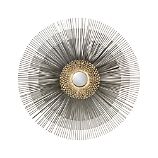
I made this sunburst using, yes, you guessed it-Cereal boxes! Thank you General Mills and whoever the people are that make hot glue sticks and glue guns. I love all the sunburst mirrors that have become so popular these days. They are beautiful pieces of art work, but starting at $200 and hitting all the way up to several thousand, I said several THOU$AND......breathe, there is just no way I'll be spending my (husband's) hard earned money on something like this. We opt to pay for other luxury items like food and shelter. But to deny oneself of beauty and art is a difficult hardship we no longer have to endure. Well, unless you don't eat cereal, then you're out of luck.
 |
| ShopBathroomLighting |
 |
| Crate and Barrel |
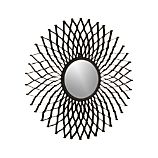 |
| Dahlia sunburst by Crate and Barrel |
If you follow Stephanie Lynn's directions, you'll come up with a beautiful Dahlia "like" mirror from Crate and Barrel. I made the sunburst and it turned out great. Suffice it to say, give me a little hot glue gun, and I become the Martha Stewart of cereal boxes. Part of me likes to be "original" and "one of a kind' so I decided to venture out on my own and make my version. Copy if you'd like. There's nothing new under the sun. (Hehe. Get it?) It's late. Work with me.
To make your own sunburst mirror start by cutting up a cereal box. A paper cutter would be wonderful here, but if you're like me, good old fashion scissors and a ruler it is. Yeah for old fashion...boo for the extra time it takes to cut light cardboard. Measure 1/4 inch apart and cut into strips.

I'm warning you. This takes a bit of time, so if you know someone with a paper cutter, become their best friend.

I used three different shapes for my sunburst. I'll call them the long diamond, the short diamond, and the tear drop.
 |
| Long diamond on top Short diamond on the bottom |
To make each diamond, start by folding your strips in half at the center.


Fold each half of your strip to the center like in picture 2 above then glue the center and opposite end to make the long diamond. Picture 3 below shows the two ends glued to make long diamond shape. Add glue to every fold (where the glue gun is pictured) to make the short diamond.

To make the tear drop, just fold in half and puff out the strip while holding the two ends. Don't fold creases; just puff out the strip. It will look like this.

Cut out a round disk to start attaching your diamonds to with hot glue. I used a small plate to make a template. I placed and measured everything first, then glued.


Make more long diamonds but don't glue the open ends this time. Instead, glue the open ends onto each peak of both short and long diamonds. This is your 2nd layer of diamonds.

Let your creativity take over at any time, but if you want to continue to follow along, add short diamonds in between the newly added 2nd layer of long diamonds. It will look like the picture below. I tried, oh how I tried, to make things look symmetrical.

At this point, when I thought I was done, I asked Mr. Lewisville what he thought of my project. He said, "I like it. Nice snow flake". SNOWFLAKE! SNOWFLAKE!!!! Arghhhh. Out comes the glue gun again. I added more long diamonds to each peak again, but to the highest peak like above, I added a teardrop.

I should have added all tear drops at this point, but I had strips of long diamond shaped cereal boxes all over my kitchen that I just wanted to use up with out having to make more. If you are going to make this, use tear drops on your third layer. Finally, glue all the peaks/diamonds together.

Here's a picture when its all done.


Blessings,
Lisa
What a great idea!! I think I'm going to modify it and try to make a square one and paint it to look like a wrought iron wall hanging. Unless of course you get to it first and show me how. :)
ReplyDelete